
This article is show you how to register & download X-431 PAD V Diagnostic Software.
On the home screen, tap the application icon to launch it, and then tap
“Login” to enter the login interface of diagnosis software.
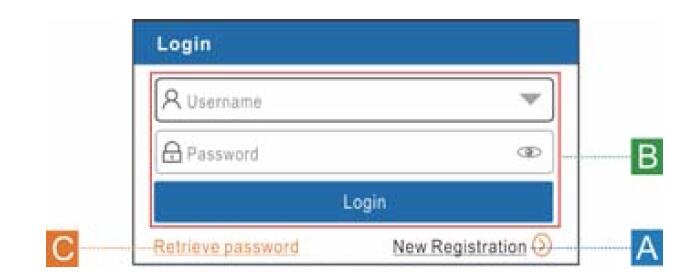
(If you are a new user, follow A to proceed.)
(If you have registered to be a member, go to B to login the system directly.)
(In case you forgot password, refer to C to reset a new password.)
A. If you are a new user, tap “New Registration” to enter registration page.
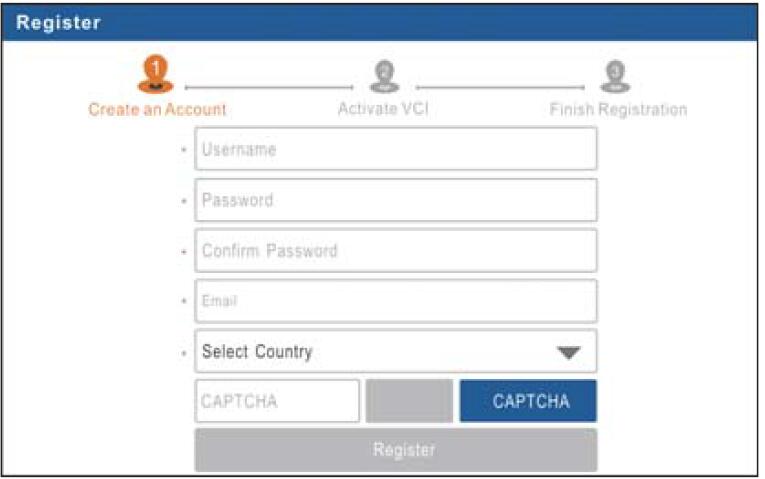
In Fig. 2, fill in the information in each fi eld (Items with * must be filled). After inputting, tap “Register”, a screen similar to the following will appear:
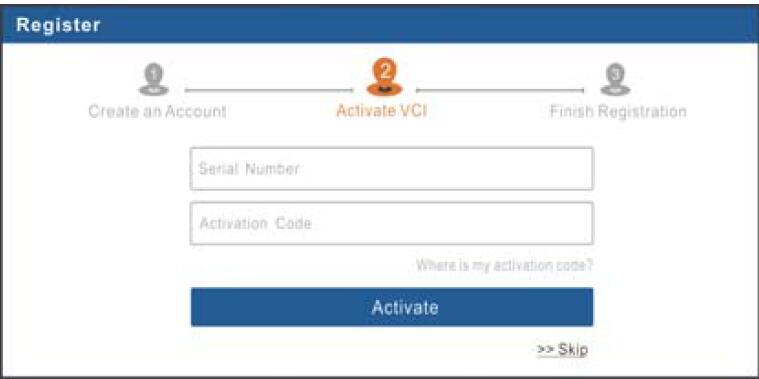
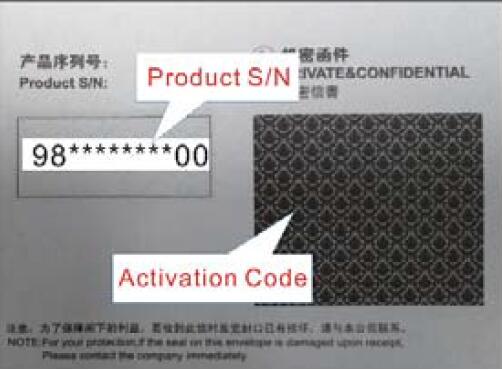
In Fig. 3, input the Serial Number and Activation Code, which can be found in the password envelope.
*Note: To exit and activate it later, tap “Skip”. In this case, you can activate your connector by tapping “Activate VCI” under the “User Info” tab.
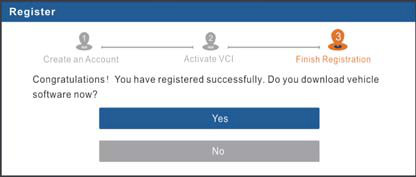
To download the diagnostic software, tap “Yes” to enter the download page. Tap “No” to download and install it later.
On download page, tap “Update” to start downloading. To pause downloading, tap “Stop”. To resume it, tap “Continue”. Once download is complete, the system will install the software package automatically.
*Notes:
•In process of download, please make sure the tablet has a strong Wi-Fi signal. It may take several minutes to finish it, please be patient to wait.
•To use the AutoDetect (VINScan) function, you have to download the corresponding diagnostic software and AutoSearch file.
B.If you have registered to be a member, input your name and password, and then tap the “Login” button to enter the main menu screen directly.
*Note: The tablet has an auto-save function. Once the username and password are correctly entered, the system will automatically store it. Next time you login the system, you will not be asked to input the account manually.
C.If you forgot the password, tap “Retrieve password” and then follow on-screen instructions to set a new password.
|
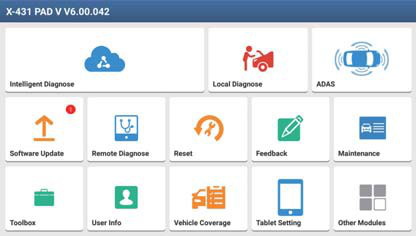
Intelligent Diagnose |
This module allows you to obtain vehicle data from the cloud server to perform quick test via reading VIN, which provides a perfect solution to various defects resulting from step-by- step menu selection. In addition, user can also check the historical repair records online through this module. |
|
Local Diagnose |
To diagnose a vehicle manually. |
|
ADAS |
This function enables users to perform ADAS (Advanced Driver Assistance System) calibration operations. The ADAS calibration software is disabled by default. Before using this function, users must activate the ADAS function using the ADAS Activation Card. |
|
Software Update |
To update vehicle diagnostic software and APK. |
|
Remote Diagnose |
This option aims to help repair shops or technicians launch instant messaging and remote diagnosis, making the repair job getting fixed faster. |
|
Reset |
To perform all kinds of common repair & maintenance items, including electronic throttle position reset, ABS bleeding, DPF regeneration, oil lamp reset etc. *Note: This module only applies to Passenger Vehicle /Gasoline & Diesel Version. |
|
Feedback |
To feed back the recent 20 diagnostic logs to us for issue analysis. |
|
Maintenance |
Abundant maintenance data are available, which helps repair professionals diagnose and repair vehicles efficiently, accurately and profitably. |
|
Toolbox |
Includes Camera, Browser, Oscilloscope, Ignition, Sensor, Multimeter, Battery etc. |
|
User Info |
To manage VCI, diagnostic reports & records, change password, configure Wi-Fi printer, sample data and logout / login etc. |
|
Vehicle Coverage |
To check the vehicle models supported on the tablet. |
|
Tablet Setting |
Configures the system setting of the tablet. |
|
Other Modules |
Includes TeamViewer, Email, Browser, Wireless Upgrade and FAQ etc. |
Vehicle Menu Layout
After downloading the diagnostic software, you can go to “Local Diagnose” to check if all software are completely downloaded and installed.
Tap “Local Diagnosis”, a screen similar to the following figure appears:
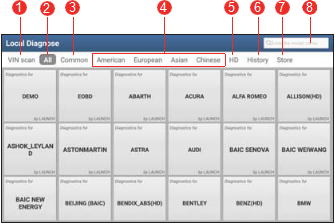
1. VINScan button: Tap it to scan the Vehicle Identification Number (VIN) code of your vehicle. OBD VIN and INPUT VIN are included. This function does not apply to the commercial vehicles.
*Note: Before using this function, the corresponding diagnostic software and Auto search file need to be downloaded on your tool first while downloading the diagnostic software.
2. All Tab: Displays all the vehicle makes in the vehicle menu.
3. Common Tab: Displays all frequently-used vehicle makes.
4. Regional buttons: Tap different buttons to switch to corresponding vehicles.
5. HD: If you have purchased a Gasoline & Diesel Version and activated it, this tab will appear.
6. History Button: Generally once a vehicle diagnosis is performed, the tablet will record the every details of diagnostic process. This function provides a quick access to the previously tested vehicles. Testing can be resumed from the previous operation without starting from scratch.
7. Store: Allows you to renew the subscription of diagnostic software and check the order status.
8. Search bar: Input the desired vehicle model to quickly locate it.
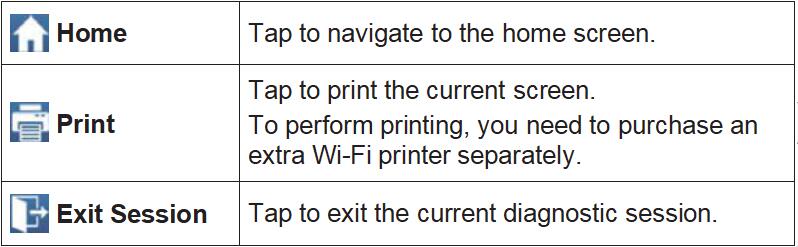
Diagnostics toolbar
The diagnostics toolbar contains a number of buttons that allow you to print the displayed data or make other controls. It is displayed on the upper right corner of the screen and goes through the whole diagnostic session. The table below provides a brief description for the operations of the diagnostics toolbar buttons
•If the VIN scanned is incorrect, tap the result field to modify it and then tap “OK”. If the VIN exists on the remote server, the system will enter the vehicle information screen. See Fig. 5-8.
•To scan it again, tap “REPEAT”.
2)Input the VIN, and tap “OK”, the system will automatically identify the vehicle model and directly navigate to the vehicle information page.
*Note: In general, vehicle identification numbers are standardized – all contain 17 characters. VIN characters may be capital letters A through Z and numbers 1 through 0; however, the letters I, O and Q are never used in order to avoid mistakes of misreading. No signs or spaces are allowed in the VIN.