What ECU Programming Tool is best for Land Rover read/write?New firmware KESS V2 5.017 or KTAG V7.020 is a good option?
Reply:
First, please check if your car & ECU is listed or not
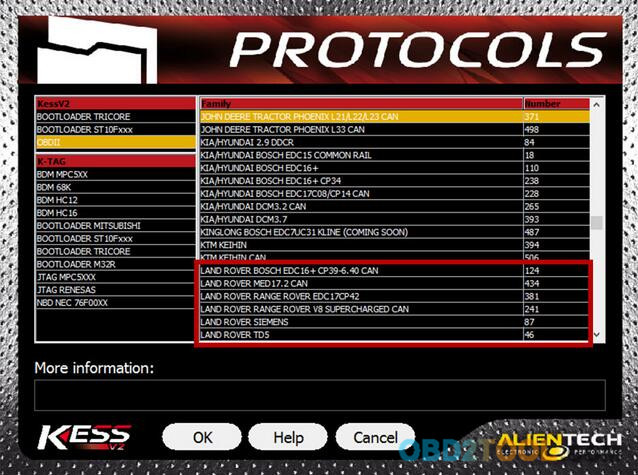
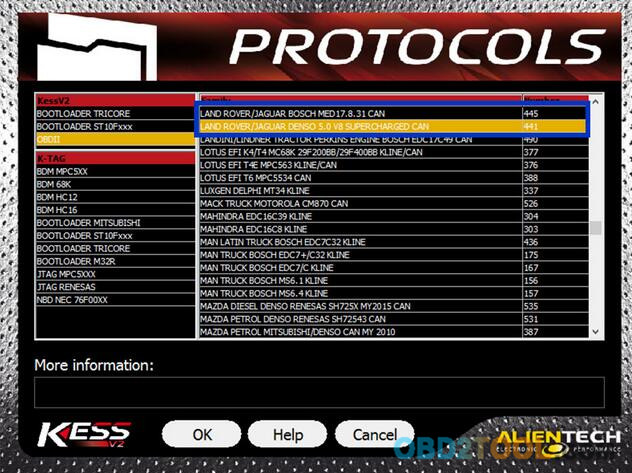
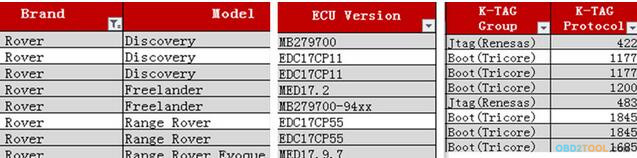
Second, which tool do you need for Land Rover?
KESS V2 is a ECU programming tool that is perfect for OBD use, while KTag is perfect for Jtag, BDM and all the Boot application (tricore and ST10).
So,personally, i would recommend you buy KESS V2 5.017 + KTAG 7.020 together coz the bundle would not only help save a lot but better for future use. Look here:
KTAG firmware 7.020:
works better, faster and more stable than old versions
adds 100+ ECU types& supports new car models e.g.Toyota 76FXXX, PSA 17.4.4, Ford E83, VW 17.5.5 (1766), Mercedes-Benz 276 ECU, Toyota 76F, etc.
more languages available English, Italian, Portuguese,French, Deutsch, Spanish)
better wiring description (inwordsnot pictures).
Kess v2 firmware 5.017:
Compared to KESS V4.036, the KESS 5.017 has been improved a lot:
100% working
No tokens limited
with original database
4.Windows 7 & Windows 8supporting, not only Windows XP
5. supports more cars & bikes & trucks unlimited tokens, fully activated
So, with Ktag v7.020 + Kess V2 v5.017, you can read and write ECU without token limitation for OBD, Jtag, BDM and Boot use for the new models and protocols. But it cannot be used for Tricore; you need go to MPPS V18 cables.
Third, how to use KESS 5.017 or KTAG 7.020 to Read/Write Land Rover ECU Data
For KESS V2 5.017 users:you can program directly through the OBD port of the vehicle, while with Ktag you need to take apart the ECU and open it, after you can make the read/write operation.
For KTAG 7.020 users: you need to disassemble from the car and open and this is the case for all the ECU (most Land Rover ECUs) that need to be programmed with Jtag, BDM and Boot protocols,but it is not a hard job,you can buy a LED BDM Frame together to simple your job.
For details, look here:
Recommendation:
1.Remove the ECU from the vehicle;
2.Open the ECU, taking care in not damaging the parts inside;
3.Reconnect the ECU to the vehicle and start the engine, in order to make sure that it is still working and has not been damaged in the opening;
4.Remove again the ECU from the vehicle;
5.Select the right plug-in;
6.Always make a backup copy of the ECU before Reading and / or Writing.
Instruction:
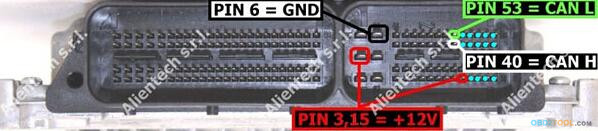
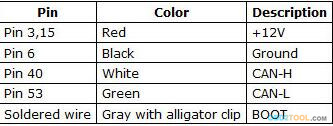
Connect to the ECU according to the pinout provided for each model (click here for connection instructions);
ECU here: EDC17 CP11 XROM TC1796
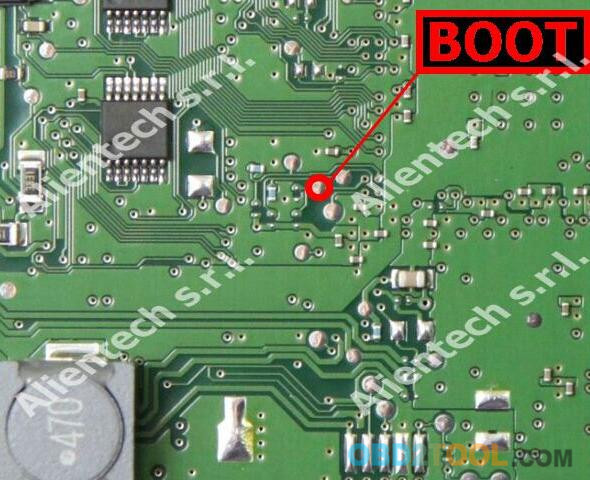
The pins Boot can be found on the left side of the ECU.
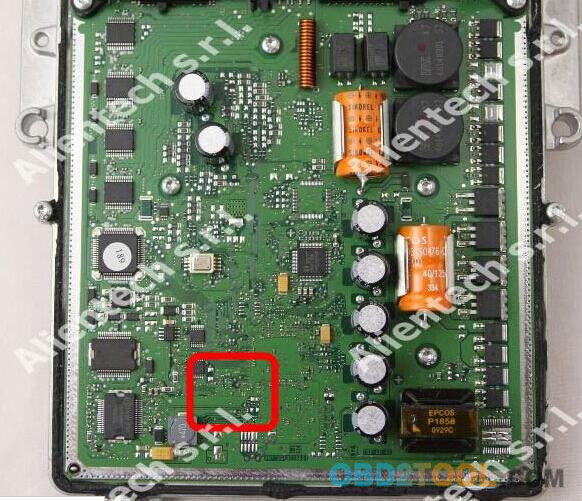
Solder a wire on pin Boot shown in the picture
Connect the cable 14P600KT02 on OBD2TOOL to the ECU connector according to the pinout below
Remove the soldered wire before re-installing the ECU on the vehicle.
Select the right plug-in;
Go to reading and programming
Backup: To make a full backup of the ECU, select Backup in the Reading box and click on Read.
Reading: Remove the check mark at the Backup option, select the component you want to read and then click on Read.
Notice: The term Maps at the side of the component indicates where the maps for engine control are stored.
Writing: Remove the check mark at the Restore option, select the component you want to write and then click on Write.
Notice: The term Maps at the side of the component indicates where the maps for engine control are stored.
Restore: To restore the backup file to the ECU, select Restore in the Writing box and click on Write.